Vimeotheque is a powerful WordPress plugin that allows you to import and embed Vimeo videos on your website. One of the great features of Vimeotheque is the ability to customize the layout of your video posts. With the help of Elementor, the popular page builder plugin, you can easily create a custom video post template that showcases your Vimeo videos in a unique and visually appealing way.
Requirements for Customizing Vimeotheque Video Layouts with Elementor
Before customizing your video post template with Elementor, you’ll need to ensure that you have the necessary plugins installed and activated on your WordPress site.
Firstly, you’ll need to install and activate Vimeotheque PRO, which is an extension of the Vimeotheque plugin that offers advanced features like Vimeo import, player customization, and more. Next, you’ll also need to have Elementor and Elementor PRO installed on your site.
Lastly, you’ll need to install the Vimeotheque PRO – Elementor compatibility add-on to enable compatibility between Elementor and Vimeotheque PRO, which allows you to create and customize your video post templates using Elementor.
Once you have these plugins installed and activated, you can start customizing your video post template with ease.
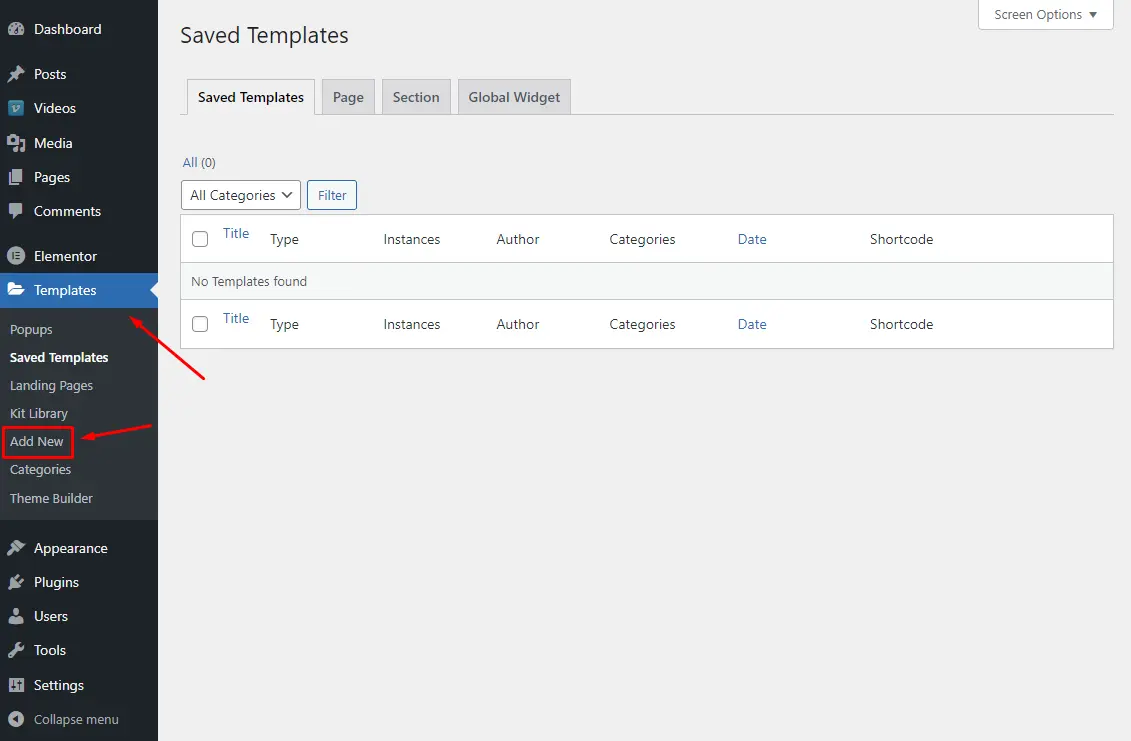
Step 1: Create a New Video Template in Elementor
To create a custom video post template for Vimeotheque using Elementor, start by accessing the Templates section in your WordPress dashboard. Click on “Add New” to create a new template and select “Single Post” as the template type. Next, provide a name for your template and click on “Create Template” to proceed.
Step 2: Preview a Vimeotheque Video Post in Elementor Template Editor
To add a specific post to be previewed when creating an Elementor template in WordPress, you will first need to navigate to the post that you want to preview. Once you have opened the post, locate the post ID in the URL. You can find this number after the “post=” parameter.
Next, go back to the Elementor template that you are creating and open it in the Elementor editor. Click on the gear icon in the bottom-left corner of the editor to open the page settings. Then, click on the “Preview Settings” tab. Here, you will see an option to “Preview Dynamic Content”.
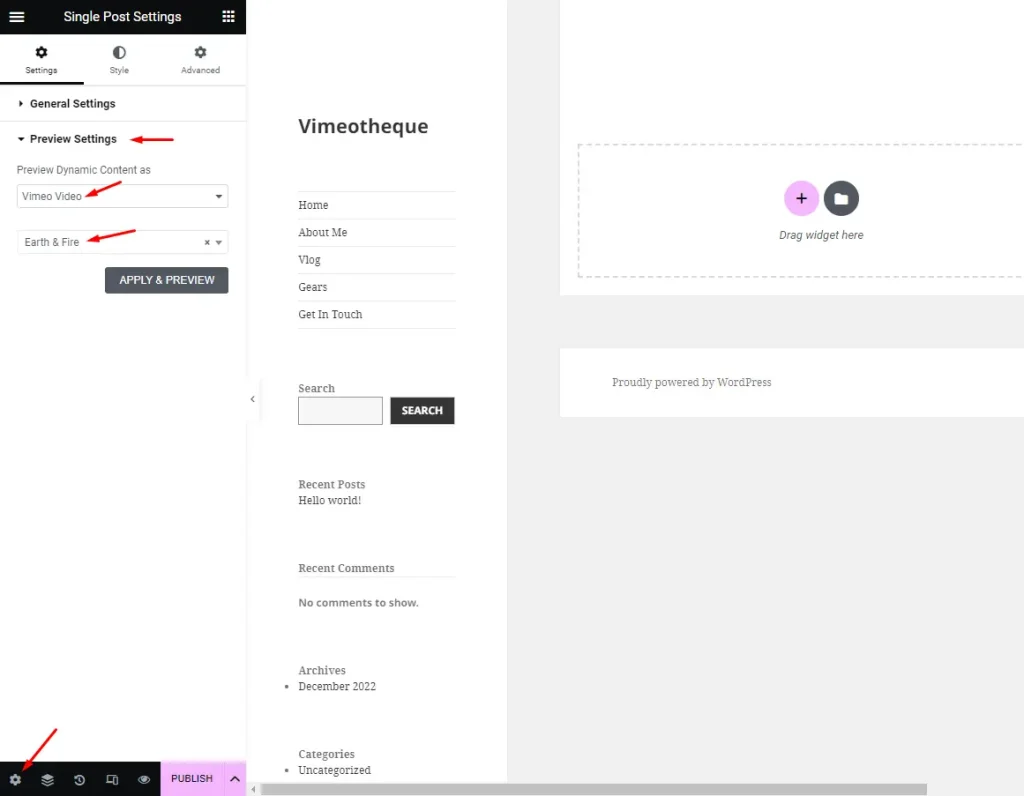
Select the post type for the post you want to preview and then enter the post ID in the field provided. This will allow you to preview the specific post while you are designing your template. You can also preview how the template will look with other posts by leaving the post ID field blank and selecting a specific category or tag to preview. Once you have finished designing your template, be sure to save your changes and publish your template.
Step 3: Customize Your Video Template with Elementor Widgets
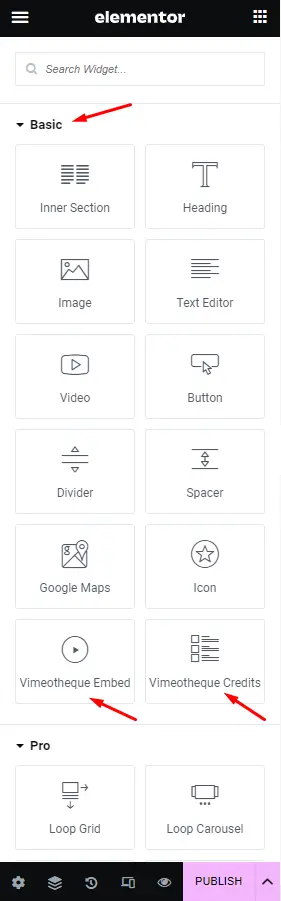
After creating your single post template, it’s time to start customizing it using Elementor widgets. You have a wide range of options when it comes to designing your video post template, including any Elementor widget available.
However, to ensure that you’re using Vimeotheque’s full potential, you should incorporate the widgets added by the Vimeotheque Elementor add-on. These include the Vimeotheque Embed Elementor template widget, which lets you embed your video directly into your post, and the Video Credits Elementor widget, which allows you to add video credits from Vimeo. Make sure to enable the option to import video credits in Vimeotheque’s settings to use this widget.
An alternative to the Vimeotheque Embed widget is to use the Featured Image Elementor widget. This allows you to display a featured image for the post, but you can choose to replace it with the video embed by Vimeotheque if there’s a video attached to the post being displayed. This option provides additional flexibility and customization options for your video post template.
Step 4: Style Your Video Template with Elementor Settings
Next, use the Elementor settings to style your video post template. You can customize the colors, fonts, and other design elements to match your website’s branding and aesthetic. You can also use Elementor’s responsive settings to ensure that your video post template looks great on all devices.
Step 5: Save Your Template and Apply it to Your Video Posts
Assigning an Elementor template to a specific post type in WordPress is a straightforward process. After creating your template, you will need to access the “Display Conditions” section in Elementor. Here, you can select the post type you want to apply the template to. You can choose to apply it to all posts, pages, or specific custom post types but in our case you should apply it to video posts imported by Vimeotheque.
Once you’ve configured the display conditions, save your changes, and the template will be applied automatically to all posts that match the conditions you’ve set. This allows you to create a unique template for each post type on your WordPress site, providing a consistent and professional look across your content.
Creating a custom video post template for Vimeotheque with Elementor PRO is a great way to showcase your Vimeo videos in a visually stunning way. With the help of Elementor widgets and settings, you can create a unique and engaging video post template that stands out from the crowd. Remember to also have the Vimeotheque PRO – Elementor Compatibility add-on installed and activated for full compatibility.